Table of Contents (click to expand)
A pin tumbler lock uses spring-loaded pins of different lengths stacked in pairs inside a rotating cylinder (the plug). With no key inserted, the pins straddle the gap between the plug and its housing (called the shear line) and jam the plug in place. The correct key lifts each lower pin to exactly the right height so the joint between every pair of pins lines up with the shear line, letting the plug turn and retract the bolt.
Since the dawn of humanity, we have had possessions that needed to be kept safe. From the clubs of cavemen hidden under rocks to the nuclear launch codes protected by virtual encryption, certain things just need to be kept safe! The oldest known lock and key, a roughly 4,000-year-old wooden pin tumbler found in the ruins of the Khorsabad palace near Nineveh, comes from ancient Assyria. Ancient Egyptians used a strikingly similar wooden pin-tumbler design around 2000 BC. With the onset of the Industrial Revolution in the late 18th century, locks became much more sophisticated, and in 1865 American inventor Linus Yale Jr. patented the compact metal cylinder pin tumbler lock (US patent 48,475) that virtually every modern house key still uses today.
How Does A Pin And Tumbler Lock Work?
A pin tumbler lock has two main parts: an outer housing (the shell) and an inner rotating cylinder called the plug, which is the part you push the key into. The plug fits snugly inside the shell, and the thin gap between them is called the shear line. Drilled vertically through both the shell and the plug are five or six pin chambers, and each chamber holds, from top to bottom, a small coil spring, a driver pin (usually all the same length), and a key pin (varying lengths to match the cuts on the key).
With no key inserted, the springs push each pair downward so the driver pins protrude into the plug, crossing the shear line and locking the plug to the shell. Try to turn the plug and it physically jams against the driver pins.
When the correct key is inserted, each cut on the blade lifts its key pin by exactly the right amount. The joint between the key pin and the driver pin above it ends up sitting flush with the shear line in every chamber at once. Nothing crosses the gap any more, and the plug is free to rotate. A small cam at the back of the plug turns with it and pulls back the bolt. A wrong key lifts the pins to the wrong heights, so either a key pin or a driver pin is left straddling the shear line, and the plug stays stuck.
How To Pick A Pin-and-Tumbler Lock?
Picking a pin tumbler exploits the fact that, in the real world, the pin chambers are never drilled in perfectly straight alignment. Tiny manufacturing tolerances mean one pin always binds slightly before the others when you twist the plug, and you can set each pin one at a time.
Step 1:
Gather two tools: a tension wrench (a small L-shaped piece of metal, sometimes called a torque wrench) and a pick (a thin metal probe with a slight hook at the tip). In a pinch, two straightened bobby pins or a pair of paperclips will do the job, one bent into an L for tension and the other with a tiny hook at the end for the pick.
Step 2:
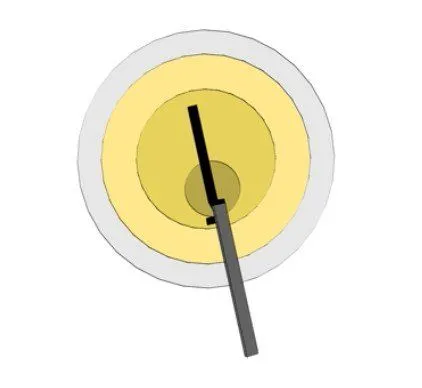
Determine the direction in which the lock is supposed to rotate. You can do this by using the tension wrench. Insert its smaller end into the edge of the slit, exactly where you would insert the key. Turn the wrench to get a feel for which direction is easier to turn. That’s the direction in which the lock is supposed to rotate. Turn the lock’s cylinder in the correct direction and hold it that way.
Step 3:
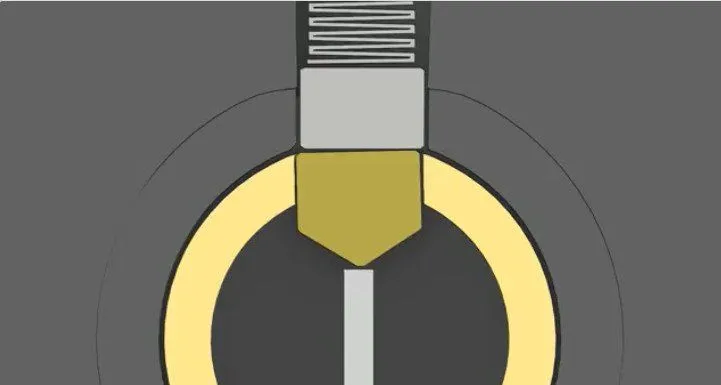
Insert the pick into the upper part of the keyhole and feel the pins. You should be able to feel the force by which the pins are being pushed back down by the spring when you try to push them up. Identify which one is the most difficult to push up. If there is no observable difference in their stiffness, turn the wrench to give the pins even less room to move. You should then be able to identify the hardest pin.

Step 4:
Keep pushing the identified pin up until you hear a faint ‘click’. This means it has set with the groove in the cylinder (the shear line). The upper part of the pin is completely out of the cylinder and is now compressing the spring. The most important part here is to keep the tension wrench in place with the two halves of the pin separate; if you loosen your grip, the upper pin will fall back down under the spring’s force.
Step 5:
Work your way around the remaining pins using the same strategy. You might need to adjust the torque on your wrench after each pin ‘sets’ into the groove of the lock’s cylinder. Once all the pins are set, you should be able to turn the cylinder and open the lock!
Although, pin-and-tumbler locks aren’t the only locks out there, they have been in use for ages and it seems like they’re going to stay that way. The security level of such a lock depends on various factors, such as the number of pins, the width of the slit and the accuracy of the design. Sometimes, keys are indented on the plain surface to make it even more difficult for instruments to mimic the behavior of actual keys. However, for most locks, once you master this technique, lost keys won’t be a problem for you anymore.